Showing posts with label mmm good. Show all posts

Tuesday, October 30, 2012

Berry Granola Parfait

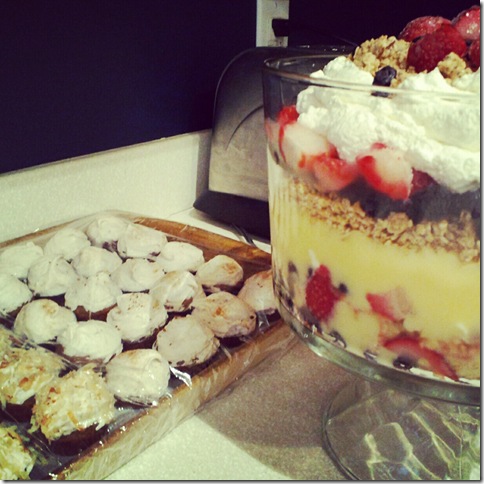
berry granola parfait trifle 


I posted this picture last week in an Instagram round up and have gotten so many emails and comments about the trifle that I figured I should give y'all some addition details.

Our bi-monthly moms group rotates which ladies bring breakfast dishes to each meeting, and my table was slotted for this past week.  Sickness and work situations had a few of the moms at my table unsure that they'd be able to attend, so I upped my game and prepared three dishes instead of the required one.  I don't say that to toot my horn, but to lay the ground work when I tell you I needed to keep it simple and inexpensive.

The parfait in the trifle dish was the belle of the ball, but was SO simple and frugal.  In fact, I think I only spent $4.50 to purchase the ingredients I didn't have on hand.  Here's how it breaks down:

Ingredients include blueberries and strawberries (I thawed out only what I needed from my freezer stash of summer's bounty); store brand granola cereal ($1.49 at Aldi); vanilla pudding mix (of course you could use yogurt instead), and whipped cream.

I merely laid a ring of blueberries around the base of the dish, filling the center with granola.  A layer of strawberries followed, then a layer of pudding.  More granola, then fruit, then the remainder of the pudding right in the center, topped with fresh whipped cream (just a pint of heavy cream whipped with a little powdered sugar), and a final sprinkle of granola and berries.

SO pretty, and SO easy, and SO yummy.  Granted, I realize that yogurt would have been healthier than pudding, but, well, I like pudding better, and since I figured I might be bringing leftovers home, I wanted to make sure it'd get eaten.  (I needn't have worried; I only brought a large serving home, and Jim and the kids and I were all fighting over it!)

I promise, you could throw this together for any potluck or shower or holiday gathering coming up, and it'll be a sure hit!

Saturday, October 22, 2011

Peanut Butter Perspective

ppp warm #1

Chances are, he’ll remember the Saturday afternoon in October when we made peanut butter cheesecake.

ppp warm #2 
Chances are, I won’t remember the mess he made eating the leftover crust crumbles.

ppp warm #3 
(And if, by chance, I do remember the mess, I’m pretty certain…..I’m not gonna care.)

Thursday, August 18, 2011

What’s for dinner?

I’ve been posting these links on Facebook, but for those of you who don’t see those posts, I thought I’d share a couple new recipes that we’ve tried over the last week or two.

First of all, thank you to Sara for getting me hooked on SkinnyTaste when she shared a link to this
 pcs

Hello, Pina Colada sorbet.  Yes, I’d like to eat you.

Since discovering Gina’s site, I’ve made Chocolate Chip Zucchini BreadIrish Soda Bread (both a sweet version and a savory version); Asian Peanut Noodles with Chicken; and Swedish Meatballs.

cczb

isb

apn

smb

Another site I’ve been inspired by is Andie’s Can You Stay for Dinner? Her story is so inspiring; I love her writing style, and her recipes are fabulous.  I’ve made two so far and both have been a hit with everyone who has tasted them.

First, I tackled the Honey BBQ Meatloaf, which fell apart for some reason (cook error, I’m sure), but it was scrumptious!  And then I made the Buffalo Chicken Rolls to take to a church potluck.  They were gone in a flash!

hbm

bcr

Not sure what’s next on my to-do list, but I’m pretty sure if I pull the recipe from either of these gals, it won’t disappoint!

all photo credit goes to respective chef/blogger, not me!

Monday, May 9, 2011

On the menu

We are wonderfully close to the I-can-count-on-two-hands number of days until we are Ohio bound, so I’m doing my best to plan our days and our meals to the best advantage in the next two weeks.  I think I’ve done it;

  • Sweet and Sour Pork with pineapple and pepper stir fry over rice (left over meat from Mother’s Day pork shoulder)
  • Tacos
  • Smoked sausage and mexican rice bake
  • Calzones
  • Maple dijon pork loin (yep, leftover  from Mother’s Day, again) with roasted apple and onion stuffing
  • Steak and veggie kabobs on the grill
  • FREE PASS meal due to small group cookout: taking crockpot baked beans
  • Pasta with red sauce and Italian sausage with garlic bread
  • ____________________
  • Whatever is leftover in the fridge
  • Quick, easy, hot-and-ready Little Ceasar’s Pizza and Crazy Bread for load-the-car night

So, next Tuesday is the only day that I’m unclear about.  But if our monthly girls’ night out happens this Thursday, then calzones get bumped to next week, and I’m home free!

Although I love to cook and try new recipes, I find myself dreading meal planning.  Until I actually do it, and then I remember how much easier my days go when I know what needs to come together to get dinner on the table.

Yea, me, and YEA for getting to say “NEXT WEEK we are headed to Greema’s house!!!!”

Friday, November 5, 2010

Let me give you a tip

Maybe you already know this.  Maybe I should have known, but I didn’t.

So, in the interest of saving you, reader, some effort, planning, eventual disappointment, and mayhaps even a last-minute dash to the grocery store for a substitute fruit for your next MOPS meeting/potluck/get together/baby shower/whathaveyou…

There is no point in freezing watermelon when it is in season, thinking that when the cold days of fall and winter descend, you’ll be oh-so-happy to have a small taste of summer goodness still at your fingertips.  You won’t, trust me.

Because you can’t freeze and then thaw watermelon and expect it to remain firm.  It won’t.  It will, however, be the exact opposite of firm.  Which, in this case, is slime.

And that just doesn’t cut the mustard in the “lovely fruit platter presentation” category.

So.

Watermelon in the trash at the curb; me, off to Kroger for a nice bunch of fresh – not frozen – grapes and berries.

Friday, October 1, 2010

Happy October!!!

I have to admit, I’m not 100% happy with how our porch turned out this year.  As I arranged things earlier this week, I kept thinking, “it was better last year.”  But then I pulled up the pictures from last year; other than the fact that last year, we had three small mums (as opposed to this years’ two gargantuan ones) and a handful more little pumpkins, it really isn’t as “better” as I thought.

Anyway, all that to say, I definitely see myself tweaking and fluffing some more in the coming weeks.  But for now, here is how we are welcoming fall this year.

Pumpkins, and a peanut. ;)

end sept 006

Froofed up wreath.
(I’d forgotten where our usual one had been stored, so I made a new one (see photo above).  When I found the original (smaller) wreath, I just layered them up.  You can’t quite see all the “WELCOME” letters, but I think you still get the gist.)

end sept 009

If you’re wondering why my pumpkins are so shiny, it’s because I spray them with Krylon acrylic indoor/outdoor clear coat.  Last year, it kept the pumpkins from rotting or being eaten for the full 2 months we had them out in the elements.

end sept 016 

Bejeweled spider candlestick (Pottery Barn).

end sept 010

The perfect perch for the palest of pumpkins.

end sept 011   

Just imagine that the mums have already bloomed…

end sept 012

I think the green pumpkin on the table is my favorite this year.

end sept 015

Still needs a little something….but what?

end sept 014

There, that’s better. ;)

end sept 008 
And forgive the quality of these next pics….stupid flash/no flash rule…. but here are the few fall touches I’ve set out inside:

A woven basket ($1 garage sale find) filled with cinnamon hazelnut potpourri; a pair of grapevine pumpkins set on the mantel among the regular decor (‘08 Target clearance!!!); and a new tradition of a framed picture of my trick-or-treater in his past Halloween costumes.  This picture will be more of a challenge now that I have two little monsters to wrangle for a photo shoot. ;)

And last but certainly not least….

Homemade beef stew bubbling in the dutch oven.  Mmmmmm!
 end sept 021 
Seeing as how I’ve yet to make my inaugural loaf of chocolate chip pumpkin bread, I’ll have to take my carbs in garlic bread form.  (Cry me a river, I know!)

end sept 023

Now that the temperatures have finally settled well below the 95-degrees we’ve been having, I think it’s safe to say, FALL IS HERE!!!

Friday, July 2, 2010

Pasta with Sausage and Peppers

Take that, Olive Garden!

For many years, I ordered the same dish at Olive Garden – Sausage and Peppers Rustica.  It was penne in red sauce with Italian sausage and red and green bell peppers.  And then, to my horror, they removed it from the menu without seeing fit to replace it with another dish that could pass as a substitute!

So back to trusty Chicken Parmesan I went.

But now…..

As summer temperatures has kept me from utilizing our oven, and as Jim’s work hours have kept him from manning the grill (at least on a weeknight), I’ve been having to use go-to recipes that require only the stovetop.

And this week, I hit jackpot.

It was supposed to just be “pasta,” which most of the time in our house is just some form of noodle and jarred Prego.  (Please, Lord, don’t let my Italian grandparents read this!)  Monday night, however, I decided to spice things up.

And wouldn’t you know it?  I put together the best dish of homemade pasta with sausage and peppers!  We have a bunch of sweet Italian sausage in our freezer – super great buy at Costco, if you’re interested – and I had a red bell pepper just about to turn, so I sliced and julienned and tossed those both into a pot of red sauce, and just let them simmer away on the stove until Jim was ready to head home for dinner.

I am SO bummed that I don’t have a picture to share – usually, I’m better about photographic evidence when I know I’m going to post a recipe – but you’ll forgive me this time, right?  It was SO yummy, we ate the whole meal plus all the leftovers so quickly, I never even had time to snap a shot!

So, if you’re a pasta-and-red-sauce kind of family like ours, make sure to take advantage of summer pepper produce, and try your own hand at this sweet, spicy sauce.  You won’t be disappointed.  (And if you are, invite me over: I’ll eat it!)

Monday, June 7, 2010

Summer + Costco + Linda = Happiness

Because you can get a four-pound flat of strawberries for only $5.99, and you can go home and ask your mother-in-law if she has Bisquik and Cool Whip, and she can read your mind and do this:

misc 008 misc 007
Do you have any favorite recipes for strawberries that just make you happy?

Thursday, March 18, 2010

How to make Green Spit

First of all, just let me thrown this disclaimer out there: I HATE that Jim’s family calls this dessert “Green Spit.”  Hate it.  But, alas, that’s just one of those things that you accept when you marry into a family.

Some people inherit Christmas in July, or a crazy Uncle Bert, or ugly china.

Me?  I got unending grass-stained laundry, Pittsburgh Steelers paraphernalia, and Green Spit.

Despite its name, it’s yummy, and it’s one of the things that my mother-in-law knows makes me happy pretty much any day of the week.  Like dark chocolate and Garden Salsa SunChips.

So, when Seth was in Ohio in February for his extended visit, Linda took it upon herself to teach Seth how to assemble this treat for me.

Interpeeps, I give you Seth’s step by step guide to Green Spit:

DSCF0975

DSCF0976

DSCF0977

DSCF0978

DSCF0979

DSCF0980

DSCF0981

DSCF0982

DSCF0983

DSCF0984

I’ll be sure to leave you with the actual recipe, but just in case you had any trouble following Seth’s pictorial instructions, it’s basically:

  • start with a big bowl of Cool Whip;
  • taste;
  • maybe add mandarin oranges, if the fancy strikes;
  • taste;
  • dump in marshmallows,
  • taste;
  • dump in more marshmallows;
  • taste;
  • dump in the rest of the bad of marshmallows;
  • and eat whopping spoonfuls between each step.

But make sure Grandpa isn’t invading, which is what the last few pictures seem to say to me:

“Hmmm…..what’s he doing?”

“Okay, he seems distracted.”

“More for me!”

Could you not just eat him up?!  So sweet!

And speaking of sweet….here’s the recipe:

Linda’s Green Spit

2 small boxes pistachio pudding
1 9 oz. tub Cool Whip
1 can mandarin oranges (drained)
1 can crushed pineapple 
1/2 bag miniature marshmallows

Consider this a belated St. Patrick’s Day post! =)

Sunday, January 24, 2010

P-dub’s Fancy Macaroni

Do you read The Pioneer Woman?  You should be.  Really.

The stories from her Oklahoma cattle ranch.

Her photography.

Her recipes.  Oh, my, her recipes.

Now, I’ll be honest.  I’ve tackled only one of Ree’s recipes, and it’s the one I’m going to share with you today.  And I have to admit that while the taste lived up to the hype, I’m a little skeptical of her labels of “Prep Time: 20 minutes” and “Difficulty: Easy.”

PW fancy mac

Per Ree’s suggestion, this Fancy Macaroni graced our Christmas table one night.  It was the perfect accompaniment to the honey-glazed spiral ham my grandma brought to dinner.

But it took my mom and I WAY longer than 20 minutes to prep, and considering the number of dishes and utensils we sullied in the process, I don’t think I, with clear conscience, lead you to believe that this is an “easy” recipe.  I, for one, do not find a recipe this involved to be easy.  (Maybe if you’re Ree, who cooks for the masses on a cattle ranch, and who has actually had a cookbook published and all; but lil’ ol’ me?  Not so much.)

Then I got to thinking, maybe Mom and I were just preoccupied talking and such, so it may have just taken us longer than if we’d been focused on the prep.  So I decided to make the recipe again for our small group potluck Sunday night.

Ahem.

Yeah.  It took me a sweet forever to get this assembled.  Maybe it was because I was pacing myself so as not to overdo it (being on the start of modified bed rest and all), but I don’t think so.  In the time it took me to slice the onions, cook the bacon (I chose to bake it), grate the cheese, and all the other various steps, I’d also had time to bake and frost a double layer chocolate cake.  From scratch.

I’m not kidding.

Again, maybe if you’re had-a-cookbook published skilled like good ol’ P-Dubn herself, then you just go on with your bad self and tell the world that this is an “easy” recipe.  Me, I’ll just tell myself as I enter the second hour of making this dish that the divine taste is worth it.

Once a year.

*That said, I DO believe that this recipe is worth your time and effort.  It is that good.

The Pioneer Woman’s Fancy Macaroni

Prep Time: 20 Minutes
Cook Time: 15 Minutes
Difficulty: Easy
Servings: 12

4 cups Macaroni
8 Tablespoons Butter
2 whole Medium Onions, Cut In Half And Sliced Thin
10 slices Regular Bacon
1 Tablespoon Bacon Grease (reserved From Bacon Slices)
¼ cups All-purpose Flour
2 cups Whole Or 2% Milk
½ cups Half & Half
2 whole Egg Yolks, Beaten
Salt And Pepper, to taste
½ cups Grated Gruyere Cheese
½ cups Grated Fontina Cheese
½ cups Grated Parmigiano Reggiano Cheese
4 ounces, weight Chevre (soft Goat Cheese)

  1. Preheat oven to 350 degrees.
  2. Cook macaroni for half the time of the package instructions. Drain and set aside.
  3. Fry bacon until slightly, but not overly, crispy. Drain on a paper towel. Reserve grease.
  4. Melt 4 tablespoons butter in a skillet and then saute onions over medium-low heat for 10 to 12 minutes, or until golden brown and soft. Set aside.
  5. In a pot, melt 4 tablespoons butter (and add 1 tablespoon of the reserved bacon grease for good measure!). Sprinkle in flour and whisk to combine. Cook, stirring constantly, over medium heat for 1 minute. Pour in milk and half & half, then cook for 3 to 5 minutes or until thick. Reduce heat to low. Add salt & pepper to taste. (Do not undersalt!)
  6. Beat egg yolks and drizzle 1/4 cup hot mixture into the yolks, stirring constantly. Stir to combine. Pour egg mixture into sauce and cook for another minute.
  7. Add cheeses and stir until melted. Add onions and bacon and stir. Taste for seasonings and add more salt if needed. Add cooked macaroni and stir to coat.
  8. Pour into a baking dish and bake for 15 to 20 minutes or until sizzling and hot. Serve with red meat or a green salad.

I have copied the recipe exactly as Ree has it on her site, but I’d encourage you to click over there yourself, just to check out her step-by-step photography.  It’s as delicious as the dish!

Bon Appetite!

Thursday, January 21, 2010

Classic Beef Stroganoff

While I’ve been known to employ the “one pound, one pan” method of feeding my family, I have to say, there may be no turning back to good ol’ Hamburger Helper after making this dish.

beef stro

1 1/2 pounds beef sirloin steak, 1/2 inch thick
1 medium onion, diced
1 garlic clove, finely chopped
2 Tbsp. butter
1 1/2 cups beef broth
1/2 tsp. salt
1 tsp. Worcestershire sauce
1/3 cup flour
1 cup sour cream
3 cups hot cooked egg noodles

  1. Cut beef across grain into about 1 1/2x1/2-inch strips.
  2. Melt butter over medium heat, and saute garlic.  Add onions, stirring occasionally, until tender.
  3. Add beef into skillet, and cook until brown. Stir in 2/3 cup of the broth, the salt, and Worcestershire sauce. Heat to boiling; reduce heat. Cover and simmer 15 minutes.
  4. Whisk remaining 1/3 cup broth into flour; slowly stir into skillet.  Heat to boiling, stirring constantly.  Boil and stir 1 minute.  Stir in sour cream; heat until hot (do not boil).  Serve over noodles.

A couple points:

  • traditional stroganoff is also made with mushrooms  (I don’t eat them, so ours didn’t have them; if you’d like, cook 1 cup mushrooms at the same step as the onion);
  • we already had left0ver steak from a previous meal, so I didn’t have to pay too close attention to actually cooking the meat, so much as reheating it;
  • I didn’t cook my onions quite long enough, and I had a hard time getting past the slight crunch in the final texture;
  • this was a GREAT meal to get red meat in front of my toddler.  Seth loves pasta, in general, but I wasn’t sure he’d go for a non-red sauce dish.  Surprise, surprise.  He gobbled it right up!
  • I didn’t realize our sour cream had gone bad (again, it’s not something we eat, so it was only from a previous recipe that I’d even had it in the fridge to begin with), but I didn’t miss the creaminess I’m sure it would’ve added to the dish.  So, yea, for saving those calories.

Overall consensus: this will be a definite go-to meal for any leftover steak in the future.  It was SO much easier to make than I anticipated, and since we all enjoyed it, I think we have a winner!

Bon Appetite!

Monday, January 11, 2010

Classic Beef Stew

beef stew

12 new potatoes, cut into fourths (1 1/2 pounds)*
1 medium onion, cut into eighths
1 bag (8 ounces) baby-cut carrots
1 can diced tomatoes, undrained**
1 can (10 1/2 ounces) condensed beef broth
1/3 cup flour
1 tablespoon Worcestershire sauce
1 teaspoon salt
1 teaspoon sugar
1 teaspoon dried marjoram leaves
1/4 teaspoon pepper
1 pound beef stew meat, cut into 1/2-inch pieces

  1. Preheat oven to 325.
  2. Mix all ingredients except potatoes in 3 1/2-to 4-quart dutch oven.
  3. Cook, covered, for 2 hours, stirring once.  Add potatoes; cook an additional  1 1/2 hours, or until beef and vegetables reach desired tenderness.

* I only had Idaho potatoes on hand, so I just picked the biggest 2 (or was it 3?) I had, and cut them into hunks.

** Our pantry is stocked with canned diced tomatoes, but mostly for chili purposes, so every can I had on hand was “diced tomatoes with green chiles,” so, in they went.  SUCH a good move – it added the best little undertone of heat and kick.

This was dinner Saturday night, and the ONLY thing that would’ve made it better was having Jim home to enjoy it, too.  (He was at the Bengals v. Jets playoff game in Cinci.)  Seth and I curled up in the recliner with steaming bowls of stew and watched Disney’s Ratatouille, and I’d have to say it was pretty much a perfect night.

I’m still on track for one-new-homemade-recipe-a-week for the new year.  I’m proud of myself, and I don’t think the boys mind either. ;)

Bon Appetite!

Thursday, January 7, 2010

Maple-glazed Stuffed Roast Pork

I mentioned the other day that I’d been trying to cook more since the holidays.  I’m averaging a brand-new recipe each week so far, and I think that is a pretty reasonable goal to keep up with.

The first try was a cranberry chicken dish that Jim said he like well enough for me to make again, but that I didn’t like well enough to bother to post the recipe for you.

But.

BUT.

BG nursery progress 001

The second attempt was my New Year’s Day dish of Maple-glazed Stuffed Roast Pork, and let me tell you, I loved it SO much, it may very well replace our Thanksgiving turkey in 2010.

Because I love you, I’m letting you in on the fun:

2 Tbsp. butter
1   apple, chopped
1-1/2 cups hot water
1 pkg.  (6 oz.) stuffing mix
1 pork loin (2 lb), butterflied
2 Tbsp.  maple-flavored or pancake syrup
2 Tbsp. mustard
1 tsp.  chopped fresh rosemary

Heat oven to 350ºF.

Melt butter in large skillet on medium heat. Add apples; cook and stir 3 min. or until crisp-tender. Add water and stuffing mix; cover. Let stand 5 min,; mix lightly.

Spoon stuffing mixture onto cut-side of meat to within 1/2 inch of edge. Roll up, jelly-roll fashion, starting at one of the short ends. Place seam-side down, in roasting pan sprayed with cooking spray.

Bake 1 hour. Mix syrup, mustard and rosemary; spread over meat. Bake 20 min. or until meat is done (160°F). Let stand 15 min. before slicing to serve.

BG nursery progress 002

Yum, yum, yummy, yum, yum.  Yum.  And again, YUM.

I misread the packaging label on the pork I picked up, and got lucky with TWO separate pieces of meat, so I just butterflied and pounded out them both, and passed one along to our neighboring bachelor roomies.  (Let’s just say, they both LOVED it, too.)

The only deviations I made from the written recipe was that I used a ground coarse mustard rub instead of the jarred condiment type, and that I used a basil seasoning, since I didn’t have rosemary on hand.

BG nursery progress 003
You’ll have to leave me a comment if you try this recipe – I’d love to know if you find it to be a hit like we did.

Bon appetite!

Sunday, November 8, 2009

Fondue Foible

fondue

It’s really a shame that I didn’t document this endeavor with photos.  It would have made for a really good blog post.

Instead, you’re getting a mediocre blog post, with only a generic picture, but, per the request of a few, you’re also getting the recipe.

Our small group met on Sunday night for Bible study and a fondue party.  As one of the four couples who own a fondue pot, we (I) were in charge of one of the dessert pots.

So, I Googled a recipe, decided to quadruple it (ahem, NOT necessary!), and proceeded to dirty every plastic and stainless steel item in my kitchen.

To help you grasp the scope of this culinary quest, here is the original recipe:

Ingredients:

5 ounces of chocolate, chopped.
1 cup of cocoa powder, sifted.
1 1/2 cups of granulated sugar.
1 1/4 cups of water.
3/4 of cup heavy cream, plus.
1/4 of cup corn syrup.
1 tablespoon of heavy cream.

Directions:

Sift the cocoa into a mixing bowl and then set aside.
Put the water, sugar and corn syrup in a pot and bring to boil.
Simmer for about 15 minutes, until the sugar solution has reduced by about 30%.
Pour the cocoa powder into the solution and blend with a whisk until smooth.
Return the chocolate mixture to the stove and continue cooking over a medium heat.
Add the heavy cream; bring to boil and allow to simmer for about 5 minutes.
Remove from the heat and stir in the chopped chocolate.
Pour into a fondue pot and keep warm.

Now, do a quick little math problem in your head, and quadruple that recipe.

Did you do it?

Did you come up with 2.5 cups of chocolate, 4 cups of cocoa, 6 cups of sugar, 5 cups of water, 3+ cups of cream, and a cup of corn syrup?

That’s a LOT of stuff.

And I attempted to cook it in my large saucepan.  Which, of course didn’t work, so I moved it to my 4 qt. Dutch oven.  Which, also, of course, didn’t work.  So I ended up making fondue in my ginormous pasta pot!

And when it was all said and done, I have enough chocolate fondue to feed an army.  Or at least my subdivision.  I have fondue in Tupperware, in Pampered Chef mixing bowls, in fondue pots, in mason jars, in the fridge, in the freezer.  It’s insanity.

And although it’s not quite as thick as I’d anticipated, it is heavenly.  (For at least today.  Something tells me I’ll be sick of chocolate by Wednesday.)

Enjoy!  (But stick with the regular measurements – trust me!)

Monday, October 5, 2009

The masses are demanding Double Corn Chowder

I had a laaaazy day on Sunday.  It was wondrous.  I spent the ENTIRE day in wool socks, yoga pants, and my 13 year old OSU sweatshirt.

I watched a ton of football, and lit candles, and filled the house with the wonderful aroma of a crockpot recipe I found in my trusty Betty Crocker cookbook.

And then I posted about it on my Facebook page, and got bombarded with requests to share the recipe.  So, here you go!

Potato Double Corn Chowder

pota corn chow

1 bag (16 ounces) frozen hash brown potatoes, thawed (4 cups)

1 can (15.25 ounces) whole kernel corn, undrained

1 can (14.75 ounces) cream-style corn

1 can (12 ounces) evaporated milk

1 medium onion, chopped (1/2 cup)

8 slices bacon, cooked and crumbled

1/2 teaspoon salt

1/2 teaspoon Worcestershire sauce

1/4 teaspoon pepper

In 3- to 4-quart slow cooker, mix all ingredients.  Cover; cook on Low heat setting 6 to 8 hours (or High heat setting 3 to 4 hours) to develop flavors.

Here are my personal, non-Betty Crocker approved tips:

1. Have your hubby surprise you with a pancake breakfast the day before you plan to make this recipe. That way, you already have bacon cooked and ready to crumble into the chowder.

2. I wish I would have sprayed the sides of my crockpot with cooking spray; the sides are not-quite-burnt, but they are going to be a PAIN to clean.

3.  Jim and I both liked the flavor, but think something is missing.  We have yet to put our finger on it.   Maybe green chiles?  It just needed a little more kick.

4.  I think 6-8 hours, even on low, is more than sufficient to cook this.  As Jim put it, the consistency ended up being “like the insides of a lima bean.”  Gross to think of, but surprisingly accurate.

5.  Also, I didn’t bother with a real onion; I just used onion flakes I had in the pantry.

Hope you all enjoy this recipe!  It was a great football-watching meal, paired with milk and blueberry muffins.  Have a great week, y’all!

Monday, September 21, 2009

Orient Express

Since becoming a stay-at-home-mom, I have really tried to expand my repertoire in the kitchen.  Unfortunately, my all-day-not-just-in-the-morning sickness with Duncan put the kibosh on that in the first few months here in Tennessee, and the trend of quick, easy, and probably not all that healthy carried over even when the morning sickness was gone.

With the arrival of fall came a renewed desire to try better.

And with a little – and I mean minimal, whoo-hoo! – effort on my part and an easy recipe from my handy Betty Crocker cookbook, I did this:

misc 002

I am most proud of myself for trying a recipe chock full of things I don’t even like – namely cabbage, vinegar, black pepper, and mandarin oranges.  But you know what?  It was yummy!  (Like, yummy enough that Jim and I both had second helpings!)

So, because I love you, I share the recipe with you, too:

Crunchy Oriental Chicken Salad
Prep time: 10 min; Cook time: 5 min; serves 6

3 tablespoons butter or margarine

1 package (3 ounces) Oriental-flavor ramen noodle soup mix

2 tablespoons sesame seed

1/4 cup sugar

1/4 cup white vinegar

1 tablespoon vegetable oil

1/2 teaspoon pepper

2 cups cut-up cooked chicken

1/2 cup dry-roasted peanuts

4 medium green onions, sliced (1/4 cup)

1 bag (16 ounces) coleslaw mix

  • In 10-inch skillet, melt butter over medium heat.  Stir in seasoning packet from soup mix.  Break block of noodles into bite-size pieces over skillet; stir into butter mixture.
  • Cook noodles 2 minutes, stirring occasionally.  Stir in sesame seed.  Cook about 2 minutes longer, stirring occasionally, until noodles are golden brown; remove from heat.
  • In large glass or plastic bowl, mix sugar, vinegar, oil, and pepper.  Add noodle mixture and remaining ingredients; toss.  Serve immediately.

***The only way I deviated from the recipe was to add the cut up chicken to the saute pan so the flavors from the toasted nuts and noodles transferred to the chicken, too.

This would be a great dish to take to a potluck or picnic, since there isn’t any dairy-based product like egg or mayo in it.

So, yea me!  For branching out and trying something new for my family.  I’ll have to make this open-the-cookbook-and-just-point-to-a-recipe a regular habit.  Bon appetite!